11/13/12

Long Lanyards


It only took me half an hour or so, but I finally remembered how to tie a lanyard knot.  Maybe I'll put together a photographic tutorial at some point in the future.

I'm experimenting with longer lanyards, particularly on my Nitecore, which I haven't been clipping onto my pocket as of recent.  Longer lanyards, of course, mean more material on the outside of the pocket; I'm hoping that even if the item finds itself sitting low in the bottom of a pocket the lanyard will remain accessible thereby preventing the frustration of digging deep into a pocket.

We'll see...

11/4/12

Victorinox Pioneer Alox - Swiss Army Knife - Unboxing

Swiss Army Knives are, perhaps, the most iconic of all pocket knives.  Their classic look is well-known and adored.  They're simple, functional, and stylish.


That said, I haven't actually owned a true Victorinox Swiss Army Knife until just recently.

I picked up a Pioneer Alox just this past Friday.  It was 50% off and something I really couldn't pass up.  In retrospect, I probably should have snagged a couple more styles; they'll well worth the money.


The Pioneer has a 2.5 inch blade, an awl, a can opener / small flat-head screwdriver, and a bottle opener / large flat-head screwdriver / wire stripper.  It also has a lanyard ring, a feature in which I was intensely interested.


The alox scales are clean and well-textured.  I imagine I prefer them compared to the traditional red scales of the iconic Swiss Army Knife but can't truly say given my inexperience.  From a purely aesthetic standpoint, I'm a bit conflicted.  The alox is beautiful and the red, well, the red is classic.  Perhaps I'll have to pick up another.


I'll be throwing this in my pocket in addition to my Spyderco.  I'm going to need to figure out a new evaluation template for multi-tools, considering the Pioneer isn't just a knife.

In any event, I really look forward to putting the Victorinox Pioneer through its paces.

11/2/12

Nitecore EX11.2 Flashlight Review


I've been using my Nitecore EX11.2 for some time now.  I carry it daily and have used it extensively.

It was a light that I fawned over for quite a while, as I do with most of the things I buyAfter finally finding an excuse, I picked one up and it's served tirelessly since it was received.


I'm using the template found here to review the Nitecore EX11.2.

Design Concept:  2

In the spirit of full disclosure, I pined over this flashlight for the longest time.  I love its design.  The stainless steel bezel looks great against the anodizing of the body.  It's clean without any superfluous features.  Just the way gear should be put together.

From a functional design perspective it's well-designed.  There aren't any superfluous features on this light.

Materials:  2

The barrel of the light is predominantly aluminum.  The piston mechanism is machined from aluminum, too.  The bezel of the light is manufactured from stainless steel.

These materials are exceptionally common in the mid-range flashlight world.  They're durable, relatively lightweight, and look good.

I can say that the flashlight, as constructed, survives a decent beating.  After a few unintended trips from my pockets to asphalt it still functions flawlessly and only has slight cosmetic damage character.

Fit of Parts:  2

The EX11.2 is well-fitted.  There is no play between any of the constituent parts.  There isn't anything to complain about in terms of how the light goes together.

Output:  2

200 lumen from a single-cell pocket-sized light is exceptional.  Moreover, the "moonlight" setting of 5 lumen is incredibly useful in low-light situations for reading or other such tasks without obliterating night vision.

The infinitely variable output is interesting, but I can't say that it's the greatest system around.  Sometimes having too many choices is detrimental.

Runtime:  2

The light runs at 200 lumen for an hour and at 5 lumen for approximately 80 hours.  In terms of a single-cell light that's not too shabby. 

The CR123a is a great battery for an EDC light, in my opinion; it's relatively compact and is pretty versatile.  The EX11.2 makes good use of the CR123a, offering average runtime for the output levels available.  Given that the low- to mid-range output levels are adequate for most applications, the battery will last for quite some time.

Beam Pattern and Quality:  2

The Nitecore EX11.2 uses a CREE R5 LED with an orange peel reflector.  It has great throw for a single-cell light with a relatively shallow reflector.  It pushes useful light out to an adequate distance for an EDC light (probably somewhere between 50 and 75 meters; I'll work on a more accurate number in the future).  Flood isn't bad, either.  It's a good light for everyday, general purpose use.

Also, the beam has a nice hotspot that transitions cleanly into the corona.  Moreover, the beam is free from artifacts.

User Interface:  1

The Nitecore EX11.2 has an infinitely variable output that's controlled by the piston mechanism.  A single press turns the light on; then, pressing and holding the piston ramps up or down the brightness.  There are shortcuts to the lowest and highest settings once the light is on.  Additionally, when the light is off there are shortcuts to the SOS beacon and strobe settings.

Infinitely variable brightness is neat but not as useful as it might sound.  If anything it complicates access to mid-range brightnesses.

Inconveniently, the piston mechanism can be a bit touchy.  On many occasions I've accidentally accessed modes that weren't intended.  I think it has something to do with the fact that the piston drive is capable of recognizing "pushes" that occur in very quick succession; pushes that are unintended and practically imperceptible by the operator.  This can lead to some frustration on occasion.

Grip: 2

A lot of single-cell lights don't offer enough surface area to facilitate comfortable use.  The EX11.2, however, is large enough to use in a hammer grip without obscuring the bezel or placing the button too far into the hand to easily access.

It is also quite possible to use the EX11.2 in a cigar hold.  I find myself pinching the light closer to the bezel than I might with two-cell lights.  Nonetheless, it's quite possible to use in such a fashion.

It should also be noted that the EX11.2 can tail stand.  It's a very useful feature allowing it to be used as a candle.

Carry Method:  1

There is an optional pocket clip for the EX11.2.  I chose to purchase it but am not using it for purposes of this review.

I've been carrying the EX11.2 vertically in my back pocket with a short lanyard.  It's easy to retrieve either with or without the lanyard.  Of course, anything loose in a pocket will eventually find its way to the bottom.

Carry Comfort: 1

The EX11.2 is pretty comfortable to carry.  In the configuration mentioned above it's no thicker than my wallet so it's practically imperceptible.  It does use CR123a batteries, so it's a bit more bulky than other single-cell options on the market.  Also, without a clip the flashlight can find its way to uncomfortable positions.


Total:  17/20

In sum, the Nitecore EX11.2 is a great little light.  The UI is a bit clunky, but is overall functional.  It can be carried well and works hard; really that's all you can ask from an EDC light.

10/24/12

"Triple Aught Design Cult"

A couple days ago I was browsing through the search queries that have lead people to this blog and came across one that was a bit odd; "Triple Aught Design Cult," it read, and I was momentarily perplexed.

I got to thinking and I've ultimately decided that, yes, there is indeed a cult of Triple Aught Design.

A cult is defined broadly as a system of religious veneration and devotion directed toward a particular figure or object.  Typically, cults consist of a statistically significant minority and are often regarded by others as strange and or sinister.

Let's break that down, shall we?

Certainly, there are a group of people out there who prefer Triple Aught Design's gear over that of others.  There are even some who go out of their way to collect TAD's products, spending quite a bit of money in the process.  Religious veneration and devotion?  Sure, I guess you could call it that.  There is definitely a conscientious following among individuals who strongly value TAD's design, manufacturing, and quality.  So, in that regard, I guess strong supporters of Triple Aught Design could be considered a bit cult-like.

Is this group of consumers considered strange by a large majority?  Perhaps.  I, myself, have encountered a couple raised eyebrows when I wax poetic about my Lightspeed or Ranger Hoodie LT.  They'll ask, "you paid how much for that," and will always be surprised and often perplexed by my response.  There are some who understand the rationale underlying the purchase of quality gear and others who would rather save some money.  Either way, most people I've come across find that spending over $200.00 on a backpack is a bit strange.

In the end, there are a lot of cult-like followers of high-end companies.  Triple Aught Design is no exception.  It's just something that happens when a company takes great care to produce excellent products.

10/19/12

Elegant Solutions - Wallet Space Pen


I've carried two pens on my person for a while now, a fountain pen and, as a go-anywhere, do-anything backup, a Fisher Bullet Space Pen.

In recent history alone I misplaced the Space Pen at least twice.  That is, until I started to carry it differently.

Being a pen that I didn't use frequently there was no reason to keep it incredibly accessible.  So, I thought, why not tuck it away in my wallet.  Most bi-fold wallets I've encountered have a perfect place just at the fold.  To allow for expansion and the like the wallet is typically designed with a hinge of sorts consisting of a bit more material; the perfect place to stash a small pen.

If a full-sized Bullet Space Pen is still too much, there's always this option, a great way to have the dependability of a pressurized pen without the bulk.  Of course, there's always the cap issue; something I'll start thinking about.  I will share any brilliant ideas here, of course.

Needless to say, where ever I go I now have a pen.  I haven't misplaced it recently, either!


______________________________________________________________

I'm hoping to have a series of "elegant solutions," this, of course, being the first.

10/15/12

10/15/12 Pocket Dump


Nope, I don't just rant about stuff on the Intertubes.  I actually practice what I preach.

  • Wallet w/ Fisher Bullet Space Pen;
  • Field Notes Red;
  • LAMY Safari Fountain Pen - EF nib;
  • Nitecore EX11.2 w/ mini lanyard;
  • Spyderco Para-Military2;
  • Leatherman Charge TTi w/ lanyard;
  • Keys w/ SOG V-cutter and SOG bottle opener / screwdriver;
  • Victorinox Summit XLT Chrono.

With jackets slowly finding their way into daily use carrying stuff gets pleasantly easier; hence, the Leatherman.  Usually I wouldn't carry both a dedicated folder and a multitool but having at least twice the number of pockets at any given time makes carrying an extra item just that much easier.

10/12/12

Battery Holders


I should probably preface this by noting that I don't carry batteries on my person.  If I did, it would only be one extra cr123a, probably in one of those storage capsules.

In any event, I do carry spare batteries in my bag.  Rather than letting them bounce around, I carry them in a battery case.  It's convenient, keeps batteries from rattling around, and offers easy access to the batteries themselves.  I purchased orange for high-visibility.

Keeping spare batteries in my bag is one of my few habits that fall closer to the "two is one, one is none" philosophy.  Batteries are often finicky and fail far easier than other gear.  As such, having a couple spares around increases the longevity and usefulness of my lights.  While I'm going to have a hard time catastrophically damaging one of my knives, a flashlight can quickly become useless absent replacement batteries.

I should also note that I've tried to buy and carry lights that use the same type of batteries.  This means I can carry spares for all my lights without being forced to inventory a number of different battery types, saving time, space, and frustration.

For the few dollars I've spent these little cases have made a world of difference.

10/9/12

LAMY Safari Fountain Pen EF Nib Review

I picked up another LAMY Safari fountain pen this past summer.  I've owned a Safari with a F nib for quite some time and, liking the line but wanting something a bit more precise, thought that picking up an EF nibbed version would be an excellent choice.


Materials:  1

LAMY's Safari line is manufactured from plastic.  It's a particularly robust plastic that doesn't have the "cheapness" feel of other inexpensive pens on the market.  I haven't experienced any cracking or other such damage in the years that I've owned Safaris.  It's nothing too exciting but it's functional as all get out.

Fit:  2

The Safari line is impeccably constructed.  There are no unwanted wiggles, rattles (it's a fountain pen, there usually aren't any rattles as there usually aren't any internal moving parts to rattle about), or other such undesirables.

The barrel screws down onto the grip section smoothly and tightens down to align the nib with the two facets of the barrel.  The "LAMY" logo on the top of the barrel can either find itself facing upward or downward but the shape of the pen remains the same consistently.


Mechanism:  2

The pen utilizes a capped design, as do most fountain pens.  Unlike most, however, the cap snaps on well and posts tight when open.

Line:  2

Initially, I owned a F nib Safari and found that it wasn't nearly as fine as I would have wanted.  The EF nib on this particular model is more to my liking.

I have been using Noodler's "Bad Belted Kingfisher."  It's just the right kind of blue...

The nib lays down an impeccably smooth line of a consistent thickness and color.

Writing Comfort:  1

There's technically a "right way" to hold fountain pens which LAMY has embraced in the design of their Safari series of pens.  Featuring two flattened grip areas ever so slightly flanking the top of the grip, the Safari promotes "proper" technique, allowing one to properly align the pen within one's fingers.

I do like this grip design, but occasionally, when feeling lazy or otherwise attempting to write with a different pen orientation, I find the grip to be unforgiving.  The crisp edges, while comfortable when writing "correctly," can be quite uncomfortable even when ever so slightly misaligned.

Design Concept:  2

The Safari series is a rather well-received line primarily because of LAMY's impeccable attention to its design.  It's easy to say that the LAMY Safari line is iconic in the world of writing instruments.

Its clean and thoughtful lines are exactly what I look for in a pen.

Markings and Insignia:  2

LAMY has their logo molded into the top of the barrel.  It pops just enough to be noticed but not enough to be gaudy.  The nib sports LAMY's logo, too, and also features the size (EF, in this case).  On the very top of the pen LAMY notes their German origins.

It's a very clean pen without any superfluous text or logos.

Carry Method:  2

The Safari uses a large pocket clip that mounts to the pen very high on the cap.  This allows it to sit low in the pocket, a feature that I prefer.

Carry Durability:  1

The clip works well.  However, it does lose tension over time and if consistently clipped to thicker fabrics (jeans, for example) will begin to show signs that the mount is being over-stressed.

I haven't experienced a failure of the pocket clip in any of the Safaris I own, but they do appear to wear faster than other designs on the market (the rOtring 600 series, for example).

Carry Comfort:  1

The body and cap of the pen are relatively wide making the Safari feel rather large when clipped in a front pocket.  It is, however, exceptionally lightweight.  Its volume is really the only thing that makes it noticeable when carried.

Total:  16/20

The LAMY Safari is a great pen for the money.  The EF nib performs as expected and will meet the needs of most writers without fuss.  It's an excellent pen for both those new to fountain pens and long-time veterans.

9/20/12

Keychain Modifications

After running the CRKT PECK knife on my keychain for a while I figured I could use a change.  I wasn't using the knife frequently enough and its utility was dwindling.


Wanting to keep the chain shackle configuration I needed slim tools and accessories.  Multitool components were the perfect fit.  SOG has made buying individual parts very convenient, but disassembling an older tool could work just as well.

I chose to add a bottle opener / flat-head screwdriver and SOG's V-cutter.  The bottle opener / screwdriver was my nod to the more "traditional" keychain tools.  It's not the greatest bottle opener particularly without the remainder of the tool but it's functional.  The screwdriver portion works well and has come in handy on occasion.


SOG's V-cutter is well-designed.  Fortunately, I haven't had the opportunity to use it since I put it on my keys.  I threw on a piece of shrink-tubing over the blades to mitigate the risk of unintentionally cutting something.  It stays on well and doesn't get in the way of using the cutter.


A bit of filing was required to get the tools to rotate freely but it's nothing that a hand-file couldn't handle.

Overall, I'm really happy with the new tools.  They have far greater potential than the small knife that was originally on there.

9/17/12

Tip Up vs. Tip Down Carry -OR- Why I Carry Tip Up

I'd like to have a short discussion about tip up verses tip down carry, going through the basics and raising a couple things to consider.  I'll then explain how I carry my knives and discuss a bit about why I choose to carry tip up.  Following the write-up there is a photo-essay of sorts illustrating the discussion.

Whether you're vacillating about tip-up versus tip-down carry or simply feel like reading a vaguely nuanced approach to the underlying theories I hope this is an interesting read. 


The Basics

There are two ways to carry a folding knife clipped to a pocket: tip up and tip down.  This refers to the direction the tip of the blade is facing when the knife is stowed away.  Another way to think about this is with respect to the pivot screw; if the clip is affixed near the pivot screw the knife carries tip down and, conversely, if the clip is affixed on the opposite side the knife carries tip up.

There are a few different things that should be considered when making the decision to carry tip up or tip down.  Among those are comfort, safety, and deployment.


Comfort

Comfort isn't necessarily the biggest concern when it comes to choosing to carry tip up or tip down, but it's worth mentioning.

Typically, when I refer to comfort I'm thinking about how comfortable something is while it's being carried on one's person (e.g., in a pocket, on a lanyard, or what have you).  Here, though, I'm thinking about comfort when the knife is being used.

As I mentioned earlier, tip up or tip down carry places the pocket clip at different points on the handle of the knife.  Tip up carry means that the pocket clip will be further down the handle and tip down carry places the clip further toward the blade.  This, of course, translates directly to where the clip sits in the hand.  In blade-forward grips (i.e., when the pivot is between the thumb and index finger) a knife that's configured for tip up carry places the pocket clip much deeper into the palm of the hand.  This can often be more comfortable than the alternative, tip down carry, which places the clip much closer to the top of the grip and, consequently, much closer to where most people tend to apply pressure to the handle.

The size and shape of the pocket clip is a major factor here, too.  Intuitively, clips with smaller profiles and smooth edges will be more comfortable than their unshapely brethren.

In the grand scheme of things comfort, as mentioned, isn't very important.  Safety and deployment are far more essential to consider.


Safety

Both tip up or tip down carry have various safety advantages and disadvantages.

The biggest safety concern when carrying any knife is the blade opening slightly in the pocket.  If this were to occur injury could result either when attempting to retrieve the knife (or something else) from the pocket or, perhaps, when sitting or bending the leg forward at the hip.  In either of these instances it's possible to be stabbed or sliced by the blade.  In case you're wondering, being stabbed isn't good.

Tip down carry eliminates the concern of being stabbed or sliced when retrieving the knife or something else from the pocket.  In a tip down configuration a hand, when stuffed into the pocket, would first come in contact with the spine of the blade thereby preventing injury.

However, if the blade opens slightly in tip down carry it's possible to be stabbed by the blade when sitting or bending the leg at the hip.  The risk is minimal, it seems, and largely depends on what type of pants the knife is secured in (for example, "traditional" jeans have higher pocket lines and potentially greater risk of leg stabbing while khakis tend to have lower sloped pockets potentially minimizing such a risk). 

Conversely, it is argued, with tip up carry the same slight opening becomes far more hazardous as the edge is facing upward.  This can only happen if the knife is carried with the handle against the rear seam of the pocket such that the blade can open toward the front of the pocket.  There is only one reason to carry a knife in that manner and, chances are, as I'll discuss below, most don't need to and shouldn't choose this option.

What about the alternative configuration of tip-up, you ask?  With the blade spine against the rear pocket seam the chances of the knife opening even the slightest bit is nullified.  Moreover, it's possible to "close" a slightly open blade by snugging the pocket clip - and the handle as a result - closer to the rear of the pocket thereby forcing closed an unintentionally opened blade.

With respect to being stabbed in the leg by the blade in tip up carry, the chances seem minimized.  As the blade is pushed up against the pocket wall the knife, as mentioned, has a far more difficult time opening itself.  Also, if the blade were to open it would be closer to the side of the pants leg; this places it away from the primary bend, if you will, that occurs when sitting down or bending forward at extreme angles.

With quality knives these risks are further minimized to the point of non-existence.  Most high-quality knives (and, to be honest, practically all knives) have blades that close quite securely and require more than simple agitation to open.


Deployment

If there's one thing that is infinitely important it's the ability to pull a knife from a pocket and have it ready for use quickly.  With most knives that means pulling it from the pocket in a manner which allows immediate access to the opening mechanism (be that a thumb stud, thumb hole, flipper, or other device).

Certainly, most people don't and have no need to truly consider shaving seconds or fractions thereof off the deployment of a knife.  I am one of those people; I have no use for a knife where fractions of a second count and if I suddenly were thrust into such a situation knife deployment, I imagine, would be among the least of my worries.

However, for academic purposes, let's consider the deployment methods of folding knives quite seriously.

Undeniably, the deployment of a knife must be dictated primarily by its mechanism.

Traditional folding knives with a thumb stud, thumb hole, flipper, or other manually "flicked" opening device as well as out-the-side (OTS) automatics should be carried, as mentioned, in a manner that facilitates quick access to the opening system.  From there, how one carries the knife would largely be dictated by personal choice, or so it would seem.  I disagree, slightly, with that assessment and believe that there is a "right way" to carry such knives and I'll discuss my assessment later.

Out-the-front (OTF) automatics, naturally, have to be carried tip-down to facilitate quick deployment of the blade.  Tip-up carry would compel the user to awkwardly grab at the opening side of the knife placing the palm of his or her hand directly in front of the blade.  Worse, perhaps, the user would have to perform some interesting maneuver to place the switch in a convenient position to fire the knife.  Also, as far as I've seen, there aren't any manufacturers that consider the existence of some crazy person interested in carrying their OTF automatic knife tip-up, as evidenced by the conspicuous lack of knives with pocket clips capable of being mounted in that configuration.

Finally, we have so-called "waved" knives.  Waved knives are those with a device that is intended to catch or snag on the lip of the pocket during deployment thereby opening the blade without additional motion.  As an interesting albeit annoying statutory note, waved knives or any folding knife capable of being drawn from the pocket into a locked position are banned here in MA.

With a waved knife, tip-down carry is immediately out of the question.  Tip-down carry would eliminate any possibility of using the wave feature as the device cannot catch on the pocket lip and therefore cannot assist the blade open.

With tip-up carry there are two options: first, with the blade against the back wall of the pocket (I'll call this "blade-rear" for convenience) and second with the handle against the back of the pocket (I'll call this "blade-forward").

The major distinction here is with respect to deployment direction.  With blade-rear carry the user must pull the knife up and rearward to utilize the wave feature.  This results in a ready stance with the deploying arm and the knife toward the rear of the body, almost concealed from view to those facing the user.  The knife slides into a traditional forward grip using this method.

Alternatively, when carried tip-up blade-forward using the wave device compels the user to draw with forward motion.  This brings the deploying arm and the knife into a forward position with respect to the body.  Also, the knife is most naturally grasped into a reverse grip through this method.

I cannot begin to attest to the various advantages or disadvantages to either grip style or initial deployment stance with respect to utilizing a blade for self-defense.  I can imagine there are many nuanced debates in various corners of the internet, many close to reaching critical mass.


My Approach

I carry my knives tip-up blade-rear thereby placing the spine of the blade firmly against the pocket seam and snugly tucked away.

In terms of comfort, this places the pocket clip further away from the areas of the knife where I usually apply grip pressure (that pressure being applied most typically close to the blade pivot).

Safety-wise, the tip-up blade-rear configuration is bombproof.  I have never experienced undesired opening of a blade carried in this manner.  As such, I have never been injured as a result of pushing my hand into a pocket with a partially open blade.

Deployment of my knife from tip-up blade-rear places the opening mechanism on all my knives in an excellent position.  Moreover, it allows a firm initial grip on the knife when pulling it from the pocket.  Tip-down blade-forward carry could achieve almost the same result but I find it results in a far more awkward hand position in deployment which compels far too many minute movements to achieve a good working grip.

In my choice of tip-up blade-rear carry I have focused principally on ease of deployment and comfort.  Some contest that tip-up is "more dangerous" but I find that assessment contentious.  It seems that tip-up blade-rear carry (the only natural option discounting some strange desire to deploy a waved knife forward into a reverse grip) is the safest possible way to carry a folding knife as it places the spine of the blade firmly against a pocket seam while the handle remains firmly clipped to the pocket.  As mentioned above, the blade has effectively zero possibility of opening when carried in this manner.


You Probably Shouldn't:

Cross-draw (i.e., carrying the knife in a pocket opposite to the deployment hand's side).  Cross-draw, when it comes to folding knives, seems counter-intuitive.  I can't seem to fathom a reason to pocket carry in such an awkward manner.  Retrieval in all the pants I own is incredibly uncomfortable and unnatural.  Also, cross-drawing a folder once again places opening hardware in undesirable positions.  I have to say it again, there simply isn't a good reason to cross-draw a folding knife.  Fixed blade knives, on the other hand, are another story for another day.

Carry a knife without a pocket clip.  Without a pocket clip the dead horse of accidental self-mutilation contemplated by the tip-up versus tip-down safety debate may actually manifest itself.  This, perhaps, warrants a reassessment of carry method to meet individual need.  However, I'm of the opinion  that carrying a folding knife without a pocket clip is a bit silly.  Retrieval is hindered (due to the knife sinking to the bottom of whatever pocket it's in), carry comfort is likely diminished (the knife could orient itself in awkward positions) and, as noted, the safety concerns of tip-up versus tip-down carry are far more likely to occur.  For these reasons, it seems that a clipless folding knife is less than ideal.

Carry a folding knife in your back pocket.  I used to back pocket carry a folding knife (SOG Flash II) and I can't remember why I did.  While it's certainly possible to carry a knife in a back pocket doing so raises some concerns that we've already laid to bed with front pocket tip-up blade-rear carry.  First, if we're still interested in keeping the blade spine firmly against a pocket seam we have to flip the clip around.  This, as with other strange adjustments mentioned above, places the spine of the blade toward the palm when retrieving the knife and, consequently, forces us to use more steps adjusting our grip when attempting to open the knife; opening hardware isn't close to the thumb and index finger and the blade, from its original palm-facing position, can't swing open.  Second, as I noticed while back pocket carrying my Flash II, the clip seems to snag on things more often.  Third, back pocket carry seems less comfortable (at least in my assessment); carrying a knife clipped to the front pocket has always been more comfortable as there isn't an inflexible mass of metal clipped to your posterior.  Finally, back pocket carry places a knife in a slightly less accessible spot when compared to front pocket carry.  Accessibility of gear is a big thing in my book and any undue burdens on retrieval are immediately suspect.


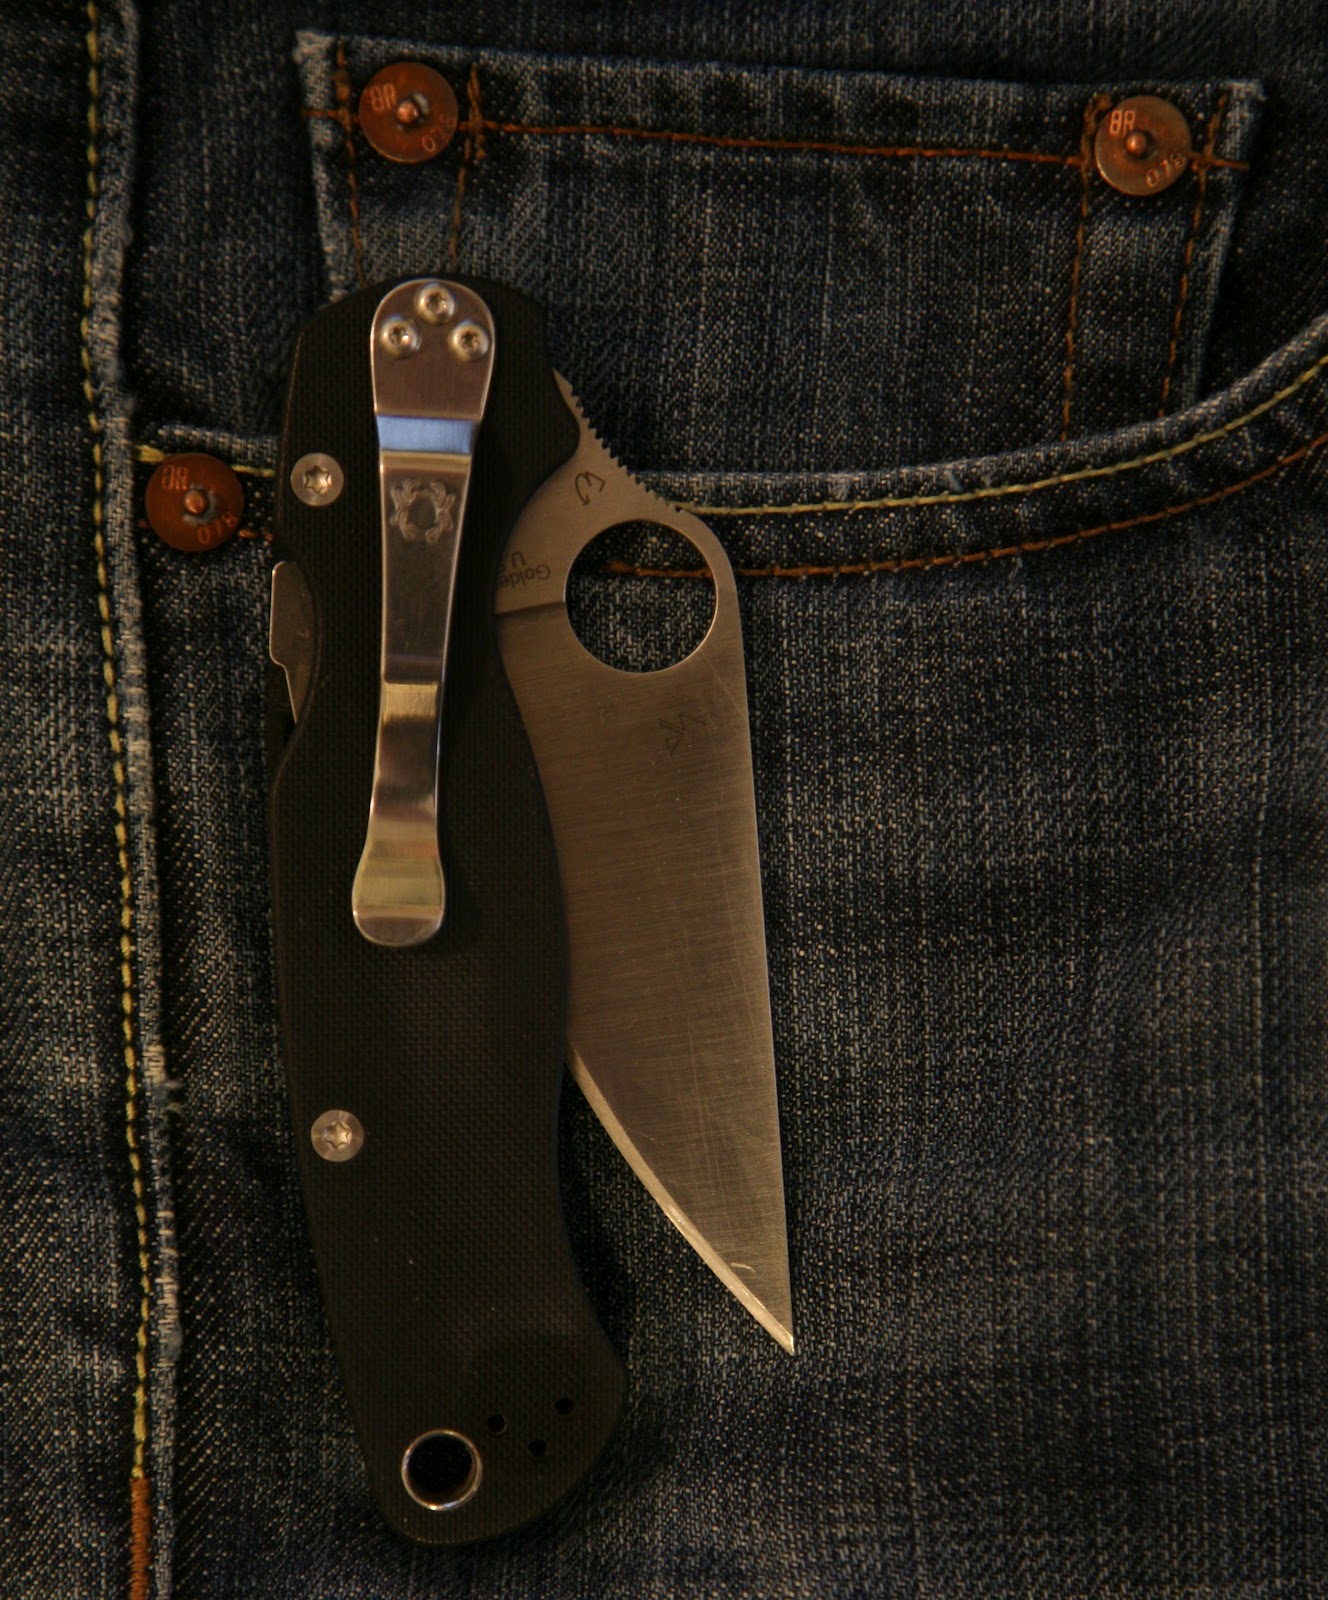
Concepts, Illustrated:

The aforementioned concepts, illustrated using a Spyderco Para-Military2.

Tip-up forward carry.  Probably the most dangerous in terms of potential disasters.

In tip-up forward carry the blade is uninhibited and may potentially open, posing a hazard during retrieval or even basic carry.

Tip-down forward carry.  Deployment following retrieval is relatively easy, but this type of carry still poses some problems.

Blade deployment is a problem in tip-down forward carry.  As seen, the blade may open unhindered and can pose a hazard.

Tip-down rearward carry.  A decent solution, but deployment after retrieval is complicated by the opening hardware (here a thumb-hole) facing in the wrong direction.

It's unlikely that the blade would open, as depicted, as the rear seam of the pocket acts as a barrier.

Tip-up rearward carry.  By far, the best option.  Deployment following retrieval is uninhibited and the potential for the blade to unintentionally open in the pocket is minimized.

As with all blade-rear carry, the potential for unintentional opening is nearly zero; the rear seam of the pocket effectively mitigates the risk.


TL;DR?

Carry tip-up blade-rear.  You don't have a good reason to do otherwise.

9/7/12

Triple Aught Design FAST Pack Lightspeed Review

I've had my Triple Aught Design FAST Pack Lightspeed for a little over one year.  I've used it extensively for school, hiking, kayaking, running, and various other tasks that have arose.

Triple Aught Design FAST Pack Lightspeed shown with TAD's OP1 pouch


Picking the Lightspeed

I'm not sure when I formally started looking for a backpack.  It probably began when I started noticing Triple Aught Design's products on the internet and saw their packs in various places.

For some reason I felt compelled to purchase a backpack.  I wanted something bombproof; an over-designed bag that I could take anywhere and beat to hell in confidence.  TAD's FAST Pack Lightspeed was on the top of the list.

I have yet to be disappointed.

Specifics 
(pulled straight from the product page)
Material
  • 1000 Denier Invista Cordura® Fabric
Dimensions
  • Volume: 1300.00 cu in/21.30 L
  • 12" W x 22" H x 5" D
Weight
  • 56.00 oz
Pocket Configuration
  • Top External Pocket with Zipper and Accessory Slots
  • Two Internal Mesh Pockets with Zippers
  • Internal Patch Pocket (fits water bladder) with Two TriGlide Rings and Hanging Clip
Zippers & Hardware
  • ITW Nexus GhillieTex™ Fasteners
  • NM DuraFlex Auto-Lok Buckles
  • YKK® #8 and #10 Nylon Coil Reverse Zippers
Features
  • Zippered Clamshell Opening
  • Hypalon Reinforced Top Handle
  • Top Access Water Bladder Port
  • Two Drain Hole Bottom Grommets
  • Two Compression Shoulder Straps
  • Horizontal Sternum Strap
  • Removable Waistbelt with Webbing
  • Removable Transporter Tail
  • Mesh and Foam Lining on Back Panel
  • PALS Webbing Rows
  • Built to MIL-SPEC Material and Construction Standards
Made in the USA

Formal Review

I'm using the outline found here to review the Lightspeed.

Design Concept:  2

This is a hard-use bag, plain and simple.  It looks like it can take a beating.  The pack is streamlined and slim.

If I could muster a complaint it would be that the bag can seem busy.  It is covered in MOLLE webbing.  As such, the exterior of the pack is a bit cluttered.  It doesn't really detract from the bag's design quality, though.  It does look more "tactical" than it otherwise would but that's more of a personal aesthetic choice than anything.

Materials:  2

1000 denier Cordura is a favorite among high-end military-type bags.  It's very durable, highly water-resistant, and exceptionally abrasion resistant.

When it comes to constructing a bag that can take a beating, 1000 denier Cordura is the way to go.  Sure, it's a bit heavy, but that's a sacrifice I'm willing to make for the durability the fabric offers.

Hardware:  2

TAD has sourced some pretty exceptional hardware for the Lightspeed.  The zippers are all YKK and in the year I've been using the bag I haven't encountered any problems.  The zipper pulls are paracord with high-end caps.  All the Lightspeed's fasteners and buckles are high-quality and, as with the zippers, have given me zero trouble.

Construction: 2

Bags are constructed by stitching.  Stitching can make or break a bag.  High quality materials can be impotent if they're not fastened together well.

That said, the stitching on the Lightspeed is exceptional.  Short of one longer-than-it-should-be thread which I quickly trimmed there were not and have not been any problems with the stitching on the bag.

Packing:  1

Backpacks require conscientious packing.  That said, some packs facilitate packing better than others.

The Lightspeed packs relatively easily.  The main zippered compartment has a clamshell opening which allows the bag to open quite wide.  My main complaint is that the clamshell doesn't extend all the way to the bottom of the bag.  This leaves a small section (approximately 3 1/2 - 4 inches tall) that doesn't unzip.  This section is a bit irritating to pack.  It would be far easier to pack the whole of the bag if the zipper extended further toward the bottom of the bag.

Retrieval:  1

Retrieving things from a backpack is directly proportional to how well they're packed.  Of course, there are bags that facilitate retrieval better than others.  The Lightspeed isn't bad in this department.

Being a backpack it's necessary to remove the bag to get anything out of its compartments.  Of course, that hinders retrieval a bit.

The design of the bag also creates difficulty.  The "beaver tail," as useful as it is, attaches to the bag in a way that requires loosening or unbuckling to retrieve anything from the main compartment.

Organization:  2

There isn't much to the pack itself.  There are two compartments, the large main compartment and a small admin-style pocket in the upper front of the bag.  Inside the main compartment there are two additional zipper pockets and a sleeve for a hydration bladder.

The exterior admin pocket contains a number of stitched-in pockets of varying sizes.  I typically carry a small notebook, a pen and pencil, a two-cell flashlight (Fenix TK-12), four spare batteries in a small holster, a Leatherman Charge TTi with additional driver bits, a flash drive, and a stick of Carmex.  It all fits and it's organized well.


The two interior zipper pockets are pretty convenient and I use them frequently.  The upper compartment can occasionally compete for space with the exterior admin pocket as they share space.

The pack's hydration sleeve is a nice feature.  There is a hanger at the top to attach a hydration badder.  A quick tip, when selecting a hydration bladder for the Lightspeed I strongly suggest getting a "slim" version such as Source Hydration's version found here.

As with most packs, there's a small hanger at the top for keys and whatnot.

Additionally, there are two attachment points at the top of the pack, presumably for their discontinued MOLLE panel.  I haven't found any uses for them, but they're there.

Modularity / Expandability:  2

MOLLE.  Everywhere.

There are countless possibilities for expanding the capabilities of this pack.

Personally, I often have TAD's OP1 attached to the pack.

It's worth noting here that the Lightspeed has two ax loops on either side.  They're incredibly convenient for attaching things, axes or otherwise.

Weight: 1

At 56 oz (3.5 lbs) it's not the heaviest bag I've ever carried, but it's not the lightest either.  My first time picking up the bag was surprising; it was a bit heavier than I was expecting.  After throwing it on my back and carrying it around for a while I realized that it's not really that heavy.

The high-density Cordura is primarily responsible for the weight of the bag.  Without it, though, the bag wouldn't be the same.

That said, the bag could probably be a bit lighter.  For example, the GORUCK GR1 has a slightly larger interior volume (26 liters compared to the Lightspeed's 21.3 liters) but is 0.3 lbs lighter.  It's not a very large difference but it's there.

Carry Comfort: 1

The Lightspeed isn't too uncomfortable to carry.  It's average, plain and simple.

My biggest complaint with the comfort of the Lightspeed is the back panel.  The air-mesh on the pack's back panel is annoying.  It doesn't make the panel more breathable and it has the potential to cause irritation on bare skin.  This happens quite often when running with the pack as the bottom of my shirt tends to ride up exposing my bare skin to the mesh.

Carryology doesn't like air mesh, and I completely agree.

Short of the mesh, though, the pack is comfortable.  With a fully-loaded pack (including three liters of water, and a DSLR with accessories) it's unobtrusive, even in long-term carry.  Additionally, the slim design of the pack makes it friendly to more athletic pursuits.


Total:  16/20 

The Lightspeed is an excellent bag.  While it's a bit expensive as far as bags go, it's well worth the price.  I enjoy using it and expect it to faithfully serve me for the foreseeable future. 


7/18/12

LAMY Safari Fountain Pen (EF)

In a rather impulsive moment I bought a LAMY Safari fountain pen with an extra fine nib from JetPens.com.  It arrived in the mail earlier this week.

I've been pining over an EF Safari for quite some time.  Owning a Safari with a fine nib, I've grown to write with the nib upside down to achieve a finer, more precise line.  Of course, this encourages scratching and snagging of the nib on the paper.  While I've learned to live with it, it's not the best of solutions.

It was time to pick up a Safari with an EF nib.

I'll run it through the pipeline and have a review sometime after the Massachusetts Bar Exam...

6/29/12

Spyderco Para-Military2 Knife Review

I've had an opportunity to kick the Spyderco Para-Military2 around the block for a good while and figured it was time to type up the review.

I unboxed it here and, suffice it to say, I've only grown more attached.

The Para-Military2 is a hot topic.  It seems like many people are buzzing about its design and quality.  I will be not be an exception to this trend, it seems.

Of course, I'm using the template found here.


Blade Material:  2

S30V.  A great steel in all respects.  S30V touts great edge retention, toughness, and corrosion resistance.  The steel is hard enough to keep a razor edge through firm use without being so brittle as to chip or splinter when encountering harder materials.

Sharpening was a breeze and I achieved a shaving sharp edge with relative ease (using a Smith's fine diamond stone initially and finishing with a fine Arkansas).  I have found it easier to obtain exceptionally sharp results with S30V than with any of the other steels I've sharpened.  Perhaps this is because S30V can simply take a sharper edge than its softer brethren or perhaps its some fluke in my perception.  Either way, I'm quite content.


Fit of Parts:  2

The Para-Military2 is the first Spyderco knife I own.  It's exceptionally well constructed.  There is nothing to complain about with respect to how this knife fits together.

When I first moved the pocket clip to the position I desired it had some side-to-side wiggle but this was remedied by torquing the screws down a bit more (I have since learned that I don't need to be gentle).  After tightening down the pocket clip I haven't experienced any movement in it whatsoever.

Blade Shape:  2

It's an excellent EDC blade, that's for sure.  The blade has sufficient belly for great slicing and a pronounced point for penetrating material.

Also worth noting is that the blade length is a great size.  It's not too long to be awkward (in terms of either manipulation or social perception) and just long enough to be useful in more than minor instances.  I feel good using this knife for everything from minor tasks (like cutting an errant thread from my shirt) to more major work (say, feathering kindling and splitting firewood, if you're so inclined).

The tip of the blade is relatively thin.  I haven't encountered any problems with it and I don't expect to run into any tasks which will compel me to use the knife as a pry-bar.

The shape, in terms of design, is quite nice.  Most of the Spyderco blades I've seen have sort of an organic feel to them, the Para-Military2 is no exception.

Blade Grind:  2

The Spyderco Para-Military2 features a full flat-ground blade.  The blade starts thick at the spine and tapers at a consistent angle to the edge.  It's a great shape.  I haven't had any problems with durability.  I've used the spine to pop caps off bottles without incident and the blade has hacked through some pretty dense firewood without skipping a beat.

It should be noted that the Para-Military2 sports an incredibly clean and consistent grind.  I don't think I would except anything less from Spyderco, but other knives I own don't appear to be manufactured with as exacting tolerances.

Mechanism:  2

The Para-Military2 uses a compression lock.  It is incredibly well designed allowing one to close the blade one-handed without placing any fingers between the blade's edge and the handle.  This is a feature that I am in love with.  I'm finding it far more convenient to use than a traditionally placed lock (that must be accessed from the "front" of the knife).

More importantly, it seems to me that the placement of the lock allows the user more positive control over the knife when closing the blade.  Closing a "traditionally" placed lock (typically a liner-lock or frame-lock) one-handed compels the user to flip the blade towards his fingers and, at least in my experience, execute a well choreographed finger ballet to maintain control of the knife and maintain the integrity of various fingers.  On some knives this ballet is more of a problem than others.  The Para-Military2, however, avoids this problem all together with its locking mechanism.

Also, the blade action is so smooth that it's possible to simply disengage the lock with the blade in a semi-upright position and have the blade effortlessly swing closed.


Design Concept:  2

If I had to describe the Para-Military2 in a word it would be "refined."

From the overarching concept to the minor details, the Para-Military2 is exceptionally well-thought.  The design itself is a refinement of the original "Military" knife, still available from Spyderco.  According to their product description, the Para-Military2 is the result of a desire to refine the Military into a better product, enhancing its ergonomics and cutting ability to produce a superior knife.

The aesthetics of the Para-Military2 are great, in my opinion.  It's clean and streamlined.  It has beautiful curves that are purposefully crafted.  Its form is dictated, it would seem, by its function.  A great marriage of usefulness and aesthetics.

Grip:  2

There are a couple things to mention here.  First, the handle is constructed from G10.  The texture of the G10 is exceptional; there's just enough bite to provide a non-slip grip without being irritating in the slightest.  Even with with slight pressure my grip seems secure.  Second, the handle shape is great.  It contours in just the right places facilitating various grip methods (both a traditional forward grip and a reverse grip feel excellent).  Finally worth noting are the finger choil and spine jimping.  These features allow one to choke up on the blade with ease and comfort making detail work a cinch.

Some have complained, or at least noted potential problems, with the handle area around the compression lock.  It has been said that the thinner handle area could be a source of significant discomfort when using the knife for prolonged periods of slicing (particularly through harder materials).  While I haven't used this knife too extensively for slicing through dense material, I haven't noticed any discomfort in the time I've been using the knife.  In gripping the knife it's certainly evident that the handle section is thinner around the compression lock, but it hasn't become uncomfortable.

Spine jimping on the Para-Military2.

Deployment Method:  2

Being my first Spyderco, this is the first knife I have owned (or even used) with a thumb hole.  Within minutes of playing with it out of the box I knew I liked it and after carrying it for the past month or so I can say that I've been convinced it's the best manual opening device out there.  One simply pushes the tip of the thumb into the thumb hole and flicks forward, opening the knife.

The thumb hole on the Para-Military2 is 14mm in diameter.  Spyderco lists it as 14mm on their documentation and I don't have the tech to verify their measurement (digital calipers are on my wishlist...).  It's a good size, I think, allowing easy function even with gloved hands (I've been using a pair of Mechanix Original gloves).

The action on the Para-Military2 is incredibly smooth.  The blade swings open almost instantly with the flick of the thumb.  I have to say it's more addicting than any of the assisted opening actions that are in my drawer.

Carry Method:  2

The Para-Military2 sports a four-position pocket clip.  As such, it's possible to carry tip-up or tip-down on the left or the right.  I have it configured for tip-up carry on the right hand side; I can't fathom why anyone would want to carry this knife tip-down.

Just enough of the knife sticks up above the pocket to facilitate a strong purchase for retrieval while not making the knife feel less-than-secure.  The pocket clip is well-constructed and provides sufficient retention; I am in no way concerned that this knife is going to find its way out of my pocket nor do I believe the pocket clip is going to become looser in the near or distant future.

There is also a prominent lanyard hole on the knife.  It has an internal diameter of about 6mm, or in more practical terms, it can accommodate three strands of 550 paracord.  Adding a lanyard could facilitate quicker retrieval but I don't think it's really necessary for most purposes.  It really boils down to personal preference and I have no need for a lanyard in my everyday carry.


Carry Comfort:  2

The knife is exceptionally light compared to others of the same size that I own.  This makes it quite the pleasure to carry.  It sits nicely and doesn't move unless asked.

Moreover, the Para-Military2 is relatively slim coming in at about 12mm.  It doesn't feel bulky in the pocket and has been exceptionally comfortable to carry.


Total: 20/20


The Spyderco Para-Military2 is the best, most exciting knife that I currently own or have had an opportunity to play with.  I do not have any complaints about this blade.  It has been in my pocket for a while and will remain there for the foreseeable future.


I highly recommend this as an everday carry blade.  For the money (around $110.00 on Amazon) it's a bargain.


6/26/12

Pocket Dump


Let's be honest...
  • Field Notes Brand pocket notebook;
  • rOtring 600 series 2 fountain pen;
  • Spyderco Para-Military2;
  • Nitecore EX11.2.

6/24/12

Peak Design Capture Camera Clip and MOLLE Compatibility

I've gotten a bit of traffic lately from people searching for information relating to the Peak Design's Capture Camera Clip and whether it's compatible with MOLLE webbing.  I figured I could describe the manner in which I'm using the Capture on my TAD Lightspeed pack.

The attachment plate on the Capture is 1.75 inches in length.  When affixing the Capture to something along the lines of MOLLE or PALS webbing, the strap cannot have loops less than 1.75 inches in size.


On my Lightspeed the webbing on the straps is just that - 1.75 inches.

The GORUCK GR1 also seems to have straps that are compatible with the Capture.

The "traditionally sized" MOLLE webbing (about 1 inch between stitch-downs) on the remainder of the Lightspeed cannot accept the Capture device.

However, the body of the Lightspeed does have "wider" straps that are stitched under the traditional 1" webbing.  These can indeed accept the Capture.  The Lightspeed seems to be unique in this and I have not seen any other bags or equipment with the "larger" of the MOLLE compatible webbing.

Alternatively, it could theoretically be possible to cut the stitching between two loops and create a space just over two inches of space.  This could accommodate the Capture.  Obviously, this would damage the bag (or whatever equipment the Capture is being installed on) and could decrease the strength and reliability of the webbing.

Ultimately...

In my evaluation, the Peak Design Capture Camera Clip is NOT compatible with "traditional" MOLLE.  The base-plate of the device is simply too large to slide into the one inch spaces found on most systems.

A 1.75 inch space is absolutely required to accommodate the device.  This style webbing exists on both the TAD packs (the Lightspeed and the EDC) and also, as far as I can tell, on the GORUCK bags (specifically the GR1).

As Applied: 6.16.12 - 6.22.12

I've seen it done before in various corners of the internet and I thought I would do something similar.  I am going to attempt to compile all the instances when the various things I carry were useful and post the list on a weekly basis.  I hope to catalog essentially everything that I do with the more "interesting" things in my pockets, those being a knife, flashlight, pen / paper, and keychain implements.

- - -


Saturday, June 16, 2012:

Flashlight:  Nitecore EX11.2
  • Illuminate yard of cabin (tripping in the dark isn't fun).
Knife:  CRKT M16-14SFG
  • Split firewood (batoned like a champ);
  • Feather kindling. 
Sunday, June 17, 2012:

Flashlight:  Nitecore EX11.2 / Olight M20S-X
  • Illuminate walkway / backyard;
  • Attempted to take photos of submerged flashlight (didn't work out as desired).
Keychain:  Flathead screwdriver
  • Tightened down camera mount on Peak Design's Camera Clip. 
Pen / Notebook:  Zebra F-701 /  Field Notes
  • Jotted down US Patent # 6,644,498 (I really wanted to know why paper napkin rings were all individually printed with patent numbers).
Monday, June 18, 2012:

Knife:  Spyderco Para-Military2
  • Enlarged ventilation hole on coffee lid.
Tuesday, June 19, 2012:

Knife:  Spyderco Para-Military2
  • Saved seedlings from groundskeepers (dug out sprouting trees).
Wednesday, June 20, 2012:

Nothing exciting.

Thursday, June 21, 2012:

Nothing exciting.

Friday, June 22, 2012:

Knife:  Spyderco Para-Military2
  • Cut paracord for bracelets.

- - -

The vast majority of the opportunities I had to use the stuff in my pockets arose from going to Maine with friends.  Of course, heading into the great outdoors always provides ample opportunity to use knives, flashlights, and the like.  A more typical week is coming and I plan to again record the instances when the stuff in my pockets has done more than take up space.  In the grand scheme of things I'm not sure this sort of post genre will get much attention.  Perhaps an installment every so often but certainly not a weekly occurrence.

5/31/12

DIY Coiled Retention Lanyards


I was browsing EDC Forums a few days back and read a thread about making your own coiled lanyards.

Figuring I didn't have anything to lose I snagged some trimmer line and went to work.

Below I've recreated the tutorial with my tweaks and observations...

Materials and Tools
  • 550 Paracord;
  • Weed trimmer line (I've used .095" and under);
  • A dowel or other rod that is heat-safe;
  • Zip ties;
  • Heat-shrink tubing (I'm using 1/4 tubing with a 2:1 shrink ratio);
  • A heat source (I'm using a small butane torch);
  • A stove;
  • A large, deep pot;
  • Water.
Step-by-Step (Relatively)

First, cut a piece of paracord that's suitable.  Keeping in mind that the stretched length of the final product is going to be slightly shorter the length of the cord that you're using.  Make sure that you leave at least 6 extra inches of cord than you think you need (for the terminus loops).

While you're at it, cut a piece of trimmer line that's a bit longer than the paracord.


"Gut" the paracord, meaning removing the seven inner strands, and feed in the trimmer line.  I've found that melting the end of the trimmer line for a second or two will blunt the corners enough to mitigate snagging on the paracord.


Next, secure one end of the line to some sort of cylinder using a zip tie or two - wooden dowels work well but here I've used a screwdriver.  Whatever you're using should be strongly heat-resistant.  Be sure to pick a cylinder that's ever so slightly smaller than the desired diameter of the coil.  There is some "expansion" of the wind between the dowel and the final product.

Make sure to leave space for a loop at the end of the soon-to-be coiled portion.

As coiled around a screw driver
Now comes the tricky part: coiling the line around the cylinder.

Begin to tightly coil the line around while maintaining as much tension as possible.  It's imperative that the coil be tight and consistently wound.  The most difficult part, I've found, is maintaining the tight coil on the line while winding the coil onto the dowel.

When the desired length is achieved, secure the end with another zip tie or two.

As coiled around a wooden dowel

Once the coil is wound, bring a pot of water (deep enough to accommodate the whole coil) to a rapid boil.  At the same time, prepare a pot or pitcher of cold water (ice could be helpful, too).  Then, submerge the coil in the boiling water for approximately 10 minutes.  After the time has elapsed remove the coil from the boiling water and plunge it into the cold water.  Leave it there for a couple minutes until it's completely cool.


After it has cooled down pull it out and clip the zip-ties to release the coil from the dowel.


Next we need to form the loops on the ends of the coil.  This is accomplished by folding the line over itself and sliding on a piece of heat-shrink tubing.


Clip the end of the line so it's slightly shorter than than the tubing.  The preshrunk tubing should look something like this:


Heat the tubing to shrink it around the line.  I've been using a small butane torch but a lighter and some patience should also work.  Be sure not to melt the paracord while shrinking the tubing.


The tubing should seal well around the single line and tighten considerably around the folded line.


When the coil is complete and the ends are looped the coil must be twisted upon itself to create a tighter, more resilient coil.  It's easier done than described, I think.

Finally, some sort of fastening hardware should be affixed to the loops.  I've used both split rings and some parts salvaged from fishing tackle.  Gate clips or the like would also be quite useful.


TL;DR?
  1. Cut both a piece of paracord and a piece of weed trimmer line to a desired length;
  2. Gut the paracord;
  3. Feed the trimmer line into the paracord;
  4. Secure one end of the line to a dowel;
  5. Wrap the line around the dowel;
  6. Secure the other end to the dowel;
  7. Submerge the whole coil into boiling water for approximately 10 minutes;
  8. Remove the coil and plunge it into cold water;
  9. Remove the coil from the dowel;
  10. Add loops to the ends by folding them over on themselves and securing with heat-shrink tubing;
  11. Twist the coil over upon itself; and
  12. Add attachment hardware.

Conclusions

I would have to say that my foray into coiled lanyards has been a success.

The few that I've made are pretty resilient and were incredibly cheap to produce.  Ultimately, the biggest investment is (generally) time.

In the spirit of full disclosure, I have no idea how these compare to commercially produced lanyards.  I believe I can safely assume that they don't compare to pistol leashes or other such "tactical" products.  However, I do believe, from my limited in-store experience, that they're better than traditional "coiled keychains" and the like.

I've used one (the international orange one I made) to secure a two-cell flashlight to my Lightspeed (it's attached about 4 inches below the top of the bag).  When the flashlight is dropped it doesn't hang much further than an inch or two below my waist.  I imagine with the same size coil and a slightly thicker trimmer line it would be much stiffer.  I'm going to give it a try when I get the chance.

In the grand scheme of things these lanyards are a great way to spend an hour or two.